The right web graphics can transform an otherwise bland site into a striking and powerful communication channel for your brand. Beautiful photographs can set an emotional tone or amplify one that you create with the text on your page. Photos of dishes on restaurant sites or haircut pics of hair salon websites make it easier for your potential clients to get an ideas of your products and services. However, selecting the right images for your website is only part of the equation.
Preparing an image to be used online requires selecting the right size, file format, and image resolution, plus additional considerations of which you may not be aware. Whether you repurpose some graphics that you previously used with your offline marketing efforts or if you have new images you would like to prepare for use on your website, there are a few web graphic best practices you should follow.
Where do you need images?
Images are very powerful, but they can be overused quite easily. Try to use photographs and graphics only where it makes sense. Keep your web graphics relevant to the content being presented on each particular page of your site. Use them when a visual explanation or demonstration will help your audience such as when you are presenting a tutorial or when you need to show the fine details of an object.
However, it is important that you have at least one image on every page of your website. If you have no natural uses for any graphics on a particular page, use an image to simply capture your reader’s eye near the top or to break up the text on a page.
Using a large photograph that fills the browser window as a background is a very popular web design trend today and can be very powerful if done correctly. These large backgrounds can limit the amount of images needed within the body area of a page as well. Jimdo makes using full screen very easy with our awesome background feature.
Use the right file format for your web graphics
There are three primary file formats used on the web: .jpg, .gif, and .png. Each one has different pros and cons. If you have images in other file formats, you will need to convert them to one of these three formats before uploading them to your website. Some website building tools will automatically convert file formats, but it is safest to do this on your own and upload the correct version to begin with.
.jpg
This file format is optimized for photographs. It handles the thousands of colors in a very manageable way allowing you to get a very good looking image with a file size that is very reasonable. Most tools that allow you to export or save as .jpg files (also called a JPEG) will allow you to adjust a quality setting that will balance the quality of the image versus the file size.
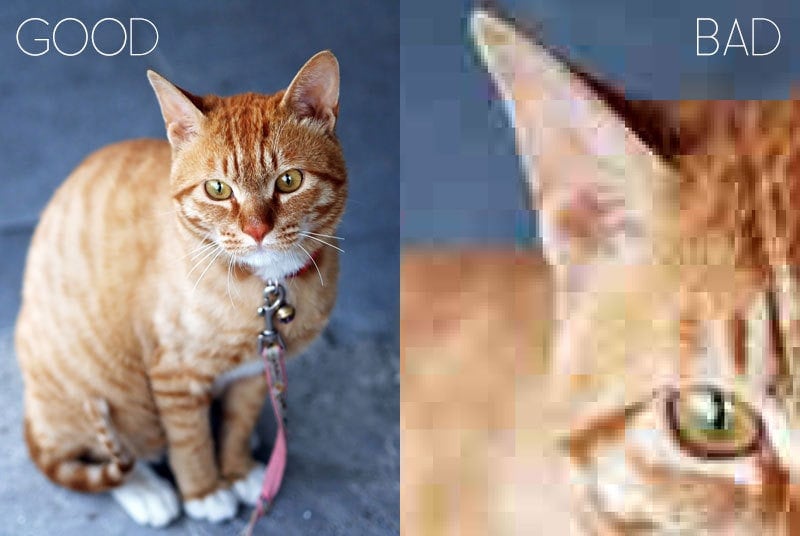
I recommend doing a trial and error method for each output image to find the best-looking image at the lowest size. An overly compressed .jpg file will be identified by different sized colored rectangles appearing within the colors of the photograph, normally in larger fields of the same color. Avoid using this file format for graphics that are large flat colors (like many logos) as they will never look as good as they will with the other options.
.gif
GIF is the older format used for flat color graphics. Created in 1987, the format is pronounced like Jif, the peanut butter. GIFs are falling out of favor for standard web graphics but still are quite popular for their ability to save multiple frames within a single file. This allows one to make animated .gifs which are very popular on the web although more for entertainment value rather than practical application. GIFs do compress solid fields of color well and even allow you to set one color to be transparent which can be very helpful when placing graphics over a colorful or photographic background.

When saving a file in this format, you may be required to select the number of colors you want in the file, from 8 to 256. The fewer the colors, the smaller the file. Again, trial and error can be used to find the correct setting for your particular situation.
.png
The PNG file is the new kid on the block from this group. For non-animated situations, .png files have almost completely replaced the use of GIFs in all other situations. They also are excellent for large fields of color and not only support transparency, but they even support different levels of transparency. This is very powerful as it allows you to have semi-opaque portions of your image where the background show through but not completely as opposed to the cookie cut-out feel of transparency with a .gif.

Saving files as PNGs has two options—8 or 24 bit. For semi-transparent images, you must use 24 bit which I would actually recommend for all flat graphic images unless you have something with only a handful of colors. In those cases, you can select the 8-bit version to save a little file size without it affecting the quality of the image. There are also online tools that can optimize PNGs without degrading quality. You can drastically reduce the file size without losing quality by using free online tools like TinyPNG.
Pay attention to the image file size and resolution
These two terms are quite common and somewhat related.
File size refers to how much space a file, in this case an image, takes up on a hard drive. Smaller file sizes are better for web graphics as they will allow the website they appear on to load more quickly. This is still important for many of the people who are accessing the web from a slower internet connection, an old computer, or their phone. The trick is that as the file size decreases, so does the quality. You will want to find the best middle ground between quality and file size which is easier now than it ever has been in the past.
When you take a photo with a digital camera or your phone, the images can be quite large, often several megabytes. Ideally, your images should be no larger than 1MB, with most smaller web graphics showing up at 100kb or less. And only a very large image like a full-screen background should be anything close to 1MB. So how do you decrease the file size?
Reducing the resolution is one way to drastically decrease file size without decreasing the quality of the image on the screen. Resolution is a measurement of how dense an image is. It is measured in DPI or dots per inch. It is a legacy term from the world of print. For printed images, you want very dense graphics that are normally above 300dpi but can go up to 1200dpi.
The important thing to understand about resolution, however, is that most computer monitors will only display at 72dpi. This means that any resolution higher than that is not adding anything to the quality of the image, but is rather just increasing the file size. So a 300dpi image and a 72dpi version of the same image will look exactly the same on the screen, but the 300dpi one will be over four times larger in file size.
For years, Photoshop has been the de facto image editor in the world, and Adobe has a built-in feature called “save for web.” This feature allows you to change the dimensions of an image, change the resolution to 72dpi, and save the file in one of the three acceptable web formats with different quality presets built-in. There are less expensive versions of Photoshop now that also allow you to use this tool, but there are also free alternatives such as Pixlr that can allow you to correct, resize, and optimally save your images for use on your website. Some website building tools offer rudimentary editing tools inside of their systems as well, but I’d recommend preparing your web graphics using tools that are specially designed for that purpose to get the best results.
Crop an image to focus on the important parts
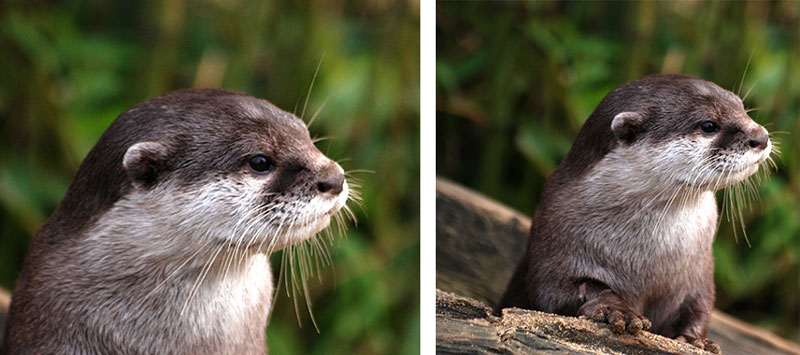
Most photos have a lot of extra and unnecessary space in them. Cropping is the process of cutting out part of an image to maximize the impact. This could be simply removing extra background to better emphasize the subject of a photograph, or it could be properly aligning the subject within the frame of the picture.
Many amateurs make the mistake of placing the subject of their photographs, either person or object, dead center in the frame. This is not appealing to most people. Typically we prefer subjects, especially people to be off-center.
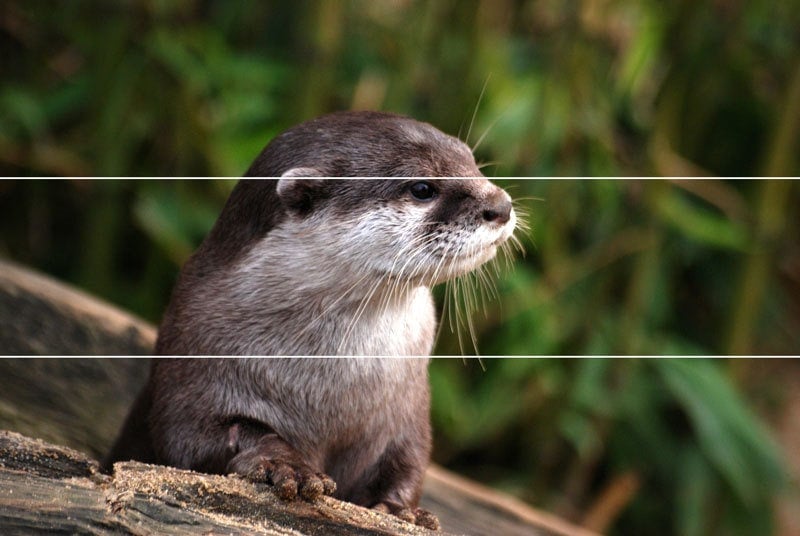
A good rule when cropping photos of people is a famous aesthetic tool called the “rule of thirds.” If you imagine overlaying two evenly distributed horizontal lines across the width of your image, you will be able to picture the image broken into thirds. The eyes of the person should be along the top of the two lines which would be 2/3rds of the way up.
Also, pay attention to the amount of space in front of a person’s nose (nose room or lead room) and the space above a person’s head (head room). If someone is looking to either side, you will want to place a bit more nose room (space between the nose and the edge of the image) so the viewer can see part of what the subject is looking at. This also comes into play when the subject of an image is an object that is obviously in motion—a race car or a jet.
Resize or crop your images to maximize the impact
Most digital photographs you take or acquire will be much larger than they need to be to use on your website. After cropping them, you will likely still need to resize them to make them fit properly on your website. Most website builders will allow you to resize an image within their system, but you will always get better results by preparing your image to be the exact size you will want it to be on the web page.
One important fact that many people do not understand, however, is that you can always make an image smaller and keep the quality, but you can never make it larger. Trying to make an image larger than it is will basically require your image editing software to “invent” pixels. This will result in fuzzy edges and pixelated images. With this in mind, if you do not know what exact size you will need for your image, err on the side of being a little too large. You can always make an image smaller inside of your website builder and retain the quality.
Note: Always make sure to keep a copy of the full-size unedited image in case you need to make changes later.
Make sure you can legally use an image before putting it on your website
Although it is super easy to find images on the internet, that does not mean that you are allowed to legally use these images, especially on a for-profit business website. Using a standard Google image search, or simply downloading and using images from any random source on the web, can easily land you in legal and financial trouble.
If you don’t have any good original photos of your own, you may want to consider acquiring some stock photography as an alternative to simply “borrowing” images you find on the web. Some of the images do have commercial usage limitations, so please make sure to read the licensing for any image you plan on using. I would also strongly recommend ignoring the common cliche stock photos, especially for service industries or more generic business websites. We have all seen the airbrushed businesswoman shaking hands with men in suits countless times.
There are so many great options for finding free or low-cost images for your website. Here is a list of the places that I personally use:
- Every Stock Photo
- Photo Pin
- New Old Stock
- Creative Commons Search
- Google Advanced Search (use the “usage rights” filter)
Conclusion
Stunning photographs and stylish graphics will help set your website apart from your competition and make it much more memorable to your audience. In order to get the maximum effect from the visual aspects of your design, it is important to prepare your web graphics by selecting the right file format, image size, and resolution. You want to ensure that your site looks great and is still quick to load. Don’t forget to crop and resize your images to maximize their emotional punch.
Do you have any questions about images for websites? Let me know in the comments or share your own tips!